A JSON configuration utility for Perfect Swift

I’m getting myself further into Perfect Swift server…

A JSON configuration utility for Perfect Swift
Download JSONConfig from GitHub

In the previous post, my Acronym sample starter for getting SSL working on your server, in Environment.swift, I hard coded stuff like ports. Sure, some of the things would change depending on conditional compilation, but that’s not the best way to go.

Better is an external file that contains configuration information.

iamjono has a great little utility that uses JSON. However, the JSON file is flat. I can’t organize the configuration information into groups. With JSON, more can be done than a flat file.

In the JSONConfig utility I posted on GitHub, you can set the source for your JSONConfig and then get values based on a key path.

For example, suppose your configuration JSON file looks like this:

{
    "server": {
        "name": "www.your-domain.com",
        "port": 80
    },
    "database": {
        "host":     "127.0.0.1",
        "username": "db_bob",
        "password": "bob_password",
        "database": "db_bob"
    }
}

In your project code, you an access values by key path.

let serverName = JSONConfig.shared.string(forKeyPath: server.name")

The default value for a String at a path is “”. You can specify something else. For example:

let serverName = JSONConfig.shared.string(forKeyPath: "server.name", otherwise: "sub.your-domain.com")

In the current release, I’m just providing convenience routines for string, integer, double, and bool. I’ll provide other data types soon. Regardless, you can get a value at a key path using:

let it = JSONConfig.shared.value(forKeyPath: "your.path.to.value") // Any?

As a last note, it is always good to validate your JSON. There are lots available online. 🙂

Perfect Swift Server Starter with SSL

I’m building an iOS app that will need a web service for the data management. I’ve looked at Firebase and CloudKit. Both are very good options but they are not going to quite fit my need with this project.

Normally, I would roll my own backend using PHP and MySQL. They are both quite familiar to me and I’ve built a number of my own frameworks to make my life easier with them. But… this is also a very good time to lift my head up and see what else is on the terrain.

Building a Perfect Swift Server Starter with SSL App
Download Acronym Project from GitHub

When Apple announced that Swift is open source, that was very exciting to me. I enjoy the language and with more people participating in its development, the quicker and the cooler the improvements would come. Swift 3 was a big change, as reflected in all the little things I had to fix in my code to migrate it from 2 to 3. But, Swift 3 seems to represent a major milestone in the language development.

In looking for back end solutions, I also looked at what was happening with Swift on the server. I found Ryan Collins post on medium.com, “Current Features & Benefits of the Top Server-Side Swift Frameworks,” very helpful. Where Perfect shines is important to me and where Perfect falls short isn’t that important to me. So I picked Perfect to examine further.

After perfect.org, my first stop was Ray Wenderlich with the great set of tutorials for Perfect.

I have a ubuntu 16.04 server that I’ve been using for Node.js and APNs. It wasn’t very hard to get going on the server. Follow the instructions found on their Getting Started page. Of course, you’ll need to also install swift. There is an script you can get from Perfect-Ubuntu or you can go Download Swift from swift.org.

The Perfect Assistant is super handy. Make sure you download/install that.

But, before you get too far down the road, get the PerfectTemplate running on your Mac and on your Ubuntu server. Once that’s running properly, we can move on to the next steps.

The next steps consist of building a basis for MySQL StORM then getting and using a certificate for https.

Ray Wenderlich’s tutorial videos talks about using PostgreSQL for its database backing for StORM. I’m wanting to use MySQL. Swapping MySQLStORM for PostgresStORM is trivial. Watch the whole series from Ray Wenderlich. The videos are short and informative.

In main.swift of my Acronym project, you can see that I’m not putting everything into main. I’m placing routes into controllers that conform to a ControllerProtocol. Database access is also separated out into an ORM object and an API class. It’s a step towards more SOLID coding.

You will also notice that I’m using a class called Environment (for the lack of a better name). Environment has a static variable isXcode that is true #if Xcode. Based on that variable, I return different values for things like serverPort. I’m also initializing the MySQLConnector in a static func in Environment. How to setup a MySQL database on your server is something I’m not going to cover here.

In Environment, you’ll also see that the serverName is returned as “sub.your-comain.com” — this will need to be updated to your actual domain.

Out of the box, Acronym will start the server on port 80 on Linux. It also will serve static files out of ./webroot with the FilesController. This is important to get the LetsEncrypt Certbot installed. Read the excellent post by Jonathan Guthrie titled Easily Secure your Perfect Server Side Swift code with HTTPS for instructions on how to install the LetsEncrypt Certbot.

The first step is to install certbot with the following:

sudo add-apt-repository ppa:certbot/certbot
sudo apt-get update
sudo apt-get install certbot

Because the Acronym app is serving up static pages out of ./webroot, when you run the following command, the certbot will be able to confirm your website by adding and removing some data in a specific path in ./webroot.

sudo certbot certonly --webroot -w /the/path/to/Acronym/webroot/ -d sub.your-domain.com

A couple notes here: 1) replace /the/path/to/Acronym/webroot/ with the actual path, and 2) replace sub.your-domain.com with your actual domain.

If all works well, you will see out put that ends with something like:

...
Creating CSR: /etc/letsencrypt/csr/0000_csr-certbot.pem
IMPORTANT NOTES:
- Congratulations! Your certificate and chain have been saved at
/etc/letsencrypt/live/test.mydomain.com/fullchain.pem. Your cert
will expire on 2017–09–18. To obtain a new or tweaked version of
this certificate in the future, simply run certbot again. To
non-interactively renew *all* of your certificates, run “certbot
renew”

Success! Now to you just need to do a couple things in Environment.swift to get Acronym to run on port 443.

  1. Have the serverPort method return 443 when !self.isXcode.
  2. Check that the keyPath string in the tls method is the same as what was stated after the “Creating CSR” above.

Now you can rebuild Acronym and launch it. When you direct your browser to https://sub.your-domain.com, you should see the little closed lock showing up!

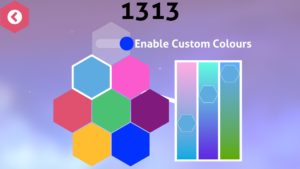
Gradients in SpriteKit

In 1313 : Puzzle Game, I wanted to add a way for the players to customize the colour of the shapes. Colour blindness can make some of the default colours hard to distinguish from each other.

The easiest way to adjust the colour is to provide sliders for red, green, and blue components. I had code kicking around from ages ago, from a drawing game called Draw Breaker, but I couldn’t find it easily. So, I decided to search for a solution.

One of the top hits was a blog entry by Maxim Bilan called Sprite Kit Gradient. Very nicely written and easy to follow. I was a bit hesitant to use a CIFilter but if it works, 差不多就行了吧.

I quickly reworked Bilan’s code into my own. And it worked for both macOS and iOS. Cool.

But. It was way way too slow. That was my worry about using a CIFilter.

Gradients are not going to be fast anyhow but my first run at the code didn’t have a very large texture to work with. I was very unhappy with the performance.

Then I remembered that I had used CAGradientLayer in Draw Breaker.

Putting the parts together, here’s the code to make a simple gradient.

#if os(OSX)
    typealias CSImage           = NSImage
#else
    typealias CSImage           = UIImage
#endif

extension SKTexture {
    convenience init( color0:SKColor, color1:SKColor, size:CGSize ) {
        let layer = CAGradientLayer()
        layer.frame = CGRect(origin: CGPoint.zero, size: size)
        #if os(OSX)
            layer.colors = [color0.cgColor, color1.cgColor]
        #else
            layer.colors = [color1.cgColor, color0.cgColor]
        #endif
        let image = layer.image()
        self.init(image: image)
    }
}

extension CALayer {
    func image() -> CSImage {
        #if os(OSX)
            let width = Int(bounds.width * self.contentsScale)
            let height = Int(bounds.height * self.contentsScale)
            
            let imageRepresentation = NSBitmapImageRep(
                bitmapDataPlanes: nil,
                pixelsWide: width,
                pixelsHigh: height,
                bitsPerSample: 8,
                samplesPerPixel: 4,
                hasAlpha: true,
                isPlanar: false,
                colorSpaceName: NSDeviceRGBColorSpace,
                bytesPerRow: 0,
                bitsPerPixel: 0)!
            imageRepresentation.size = bounds.size
            
            let context = NSGraphicsContext(bitmapImageRep: imageRepresentation)!
            
            render(in: context.cgContext)
            
            return NSImage(cgImage: imageRepresentation.cgImage!, size: bounds.size)
        #else
            UIGraphicsBeginImageContextWithOptions(self.frame.size, false, self.contentsScale)
            
            self.render(in: UIGraphicsGetCurrentContext()!)
            
            let image = UIGraphicsGetImageFromCurrentImageContext()
            UIGraphicsEndImageContext()
            
            return image!
        #endif
    }
}

In the code above, the resulting gradient will be color0 at the bottom and color1 at the top. I’ll leave it up to you to make the code more general.

One way to improve the speed of making a gradient texture is to reduce the width. In 1313, I’m making the texture a couple pixels wide and has tall as the slider. With CAGradientLayer and the 3 sliders I’m using, that does the job.